Beginner Beware
Getting started can often be the easy bit, when we are all full of enthusiasum and excited at the thought of growing our own food, beginners beware!!
Following on from last weeks topic of getting started with seed raising, by now your seedlings have popped through and looking good and you are ready for pricking out.
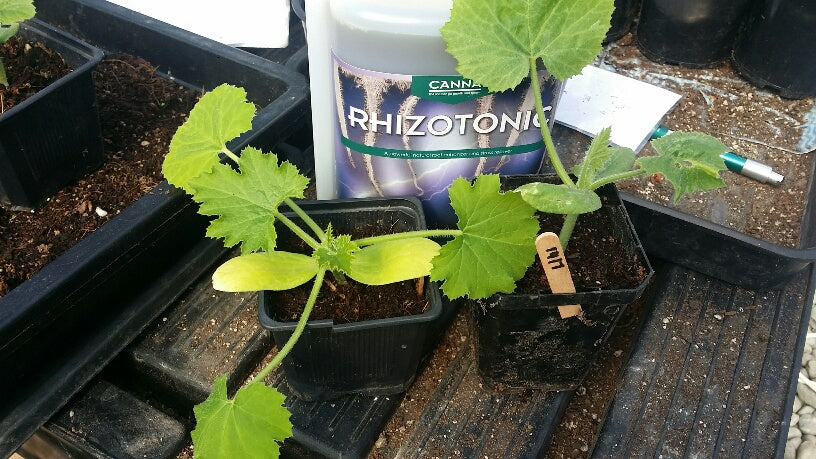
 The first leaf that a seed grows is known as the cotyledon, then shortly after this a new leaf will emerge. This is known as the true leaf. The cotyledon is there to feed the seedling in the early stage and then will die off (this is normal). Once the true leaf is well through and developed it is good to feed your seedlings with a mineral rich tonic/food, as stated last week I am hooked on Rhizotonic. It restores sickly seedlings, looks after transplanted seedlings and gives all young plants the best possible start.
Ideally, it is good to do transplanting on a warm day. Each small seedling needs to be seperated from the bunch and planted in its own cell, with clean moist seed raising mix. Some people do a mix of seed raising and potting mix. I prefer to use a good quality organic seed raising mix, and then give a regular liquid feed every week until transplanting in the soil.
 Be gentle when separating the seedling roots(especially if you over sowed). You are better to sacrifice a few sickly seedlings and work with the strongest ones. I use the end of a teaspoon and gently take hold of the top part of the seedling, and at the same time, gently wedge the end of the teaspoon down around the base of the seedling root to release it from the growing medium. Then without delay I transplant into the single cell making sure the stem and roots are well covered. Then gently pat the loose soil down(but don't pack it too tight) Job done. Ideally water from the base of the tray, not too wet, then give a light spray of Rhizotonic to the underside of the leaves, keeping in mind that the underside of the leaf is more porous and will absorb the nutrients more readily.
Life is the best teacher so expect a few hiccups along the way. Try not to spend too much time on anything that is too sickly as it will struggle all the way through and will be the plant that is attacked by bugs further down the track.
Once you have an understanding of the process then move on to more challanging seeds. For example some seeds do better if placed in the fridge for a few days, some do well to be soaked in water for a few hours. Just make sure you read
  the packet instructions and always check the use by date stamped on the seed pack before you purchase.
Plants that grow best in the heat of summer are best started in an enviroment that they will be growing in, so don't rush things too much in the early part of spring. It is a fickle time of year.
Slow and steady wins the race. Have fun, growing what you love.
 The first leaf that a seed grows is known as the cotyledon, then shortly after this a new leaf will emerge. This is known as the true leaf. The cotyledon is there to feed the seedling in the early stage and then will die off (this is normal). Once the true leaf is well through and developed it is good to feed your seedlings with a mineral rich tonic/food, as stated last week I am hooked on Rhizotonic. It restores sickly seedlings, looks after transplanted seedlings and gives all young plants the best possible start.
Ideally, it is good to do transplanting on a warm day. Each small seedling needs to be seperated from the bunch and planted in its own cell, with clean moist seed raising mix. Some people do a mix of seed raising and potting mix. I prefer to use a good quality organic seed raising mix, and then give a regular liquid feed every week until transplanting in the soil.
 Be gentle when separating the seedling roots(especially if you over sowed). You are better to sacrifice a few sickly seedlings and work with the strongest ones. I use the end of a teaspoon and gently take hold of the top part of the seedling, and at the same time, gently wedge the end of the teaspoon down around the base of the seedling root to release it from the growing medium. Then without delay I transplant into the single cell making sure the stem and roots are well covered. Then gently pat the loose soil down(but don't pack it too tight) Job done. Ideally water from the base of the tray, not too wet, then give a light spray of Rhizotonic to the underside of the leaves, keeping in mind that the underside of the leaf is more porous and will absorb the nutrients more readily.
Life is the best teacher so expect a few hiccups along the way. Try not to spend too much time on anything that is too sickly as it will struggle all the way through and will be the plant that is attacked by bugs further down the track.
Once you have an understanding of the process then move on to more challanging seeds. For example some seeds do better if placed in the fridge for a few days, some do well to be soaked in water for a few hours. Just make sure you read
  the packet instructions and always check the use by date stamped on the seed pack before you purchase.
Plants that grow best in the heat of summer are best started in an enviroment that they will be growing in, so don't rush things too much in the early part of spring. It is a fickle time of year.
Slow and steady wins the race. Have fun, growing what you love.

